1 install
yum install openvpn
2 config
在 /etc/openvpn 下建立目录,如 config/,用于存放配置文件,将服务器生成的证书、配置文件等放入其中。
3 run
openvpn --cd /etc/openvpn/config --config client_a.open
- –cd 配置文件所在的目录,openvpn命令会先进入到此目录
- –config 配置文件名称
yum install openvpn
在 /etc/openvpn 下建立目录,如 config/,用于存放配置文件,将服务器生成的证书、配置文件等放入其中。
openvpn --cd /etc/openvpn/config --config client_a.open
在 C++ 中,可调用对象一般是指:
#include <iostream>
void func(void)
{
std::cout<<"func(void) called"<<std::endl;
}
struct Foo
{
void operator()(void)
{
std::cout<<"Foo::()(void) called"<<std::endl;
}
};
struct Bar
{
using ft_t = void(*)(void);
static void func(void)
{
std::cout<<"Bar::func(void) called"<<std::endl;
}
operator ft_t(void)
{
return func;
}
};
struct A
{
int m_a;
void mem_func(void)
{
std::cout<<"A:memfunc(void) called and m_a="<<m_a<<std::endl;
}
};
int main() {
//1.函数指针
void(* func_ptr)(void) = &func;
func_ptr();
//2.仿函数
Foo foo;
foo();
//3.可被转换为函数指针的类对象
Bar bar;
bar();
//4.类成员函数指针或类成员指针
void (A::*mem_func_ptr)(void) = &A::mem_func;
int A::*mem_obj_ptr = &A::m_a;
A aa;
(aa.*mem_obj_ptr) = 123;
(aa.*mem_func_ptr)();
return 0;
}
上例中的这些对象(func_ptr,foo,bar,mem_func_ptr,mem_obj_ptr) 均可称之为 “可调用对象”。相应的,其类型可被称作“可调用类型”。注意这里只有成员函数有成员函数指针而没有函数类型或函数引用类型,这是因为函数类型并不能直接用于定义对象,而函数引用或以看做一个 const 的函数指针。 可调用对象具有比较统一的调用形式,即使用括号操作(除成员函数指针),而定义的方法各不一样。这样我们在试图使用统一的方式保存,或传递一个可调用对象时,会十分烦琐。
std::function 是一个类模板,它可以容纳除了类成员(函数)指针之外的所有可调用对象。通过指定它的模板参数,它可以用统一的方式处理函数、函数对象、函数指针,并允许保存和延迟调用它们。
继续阅读

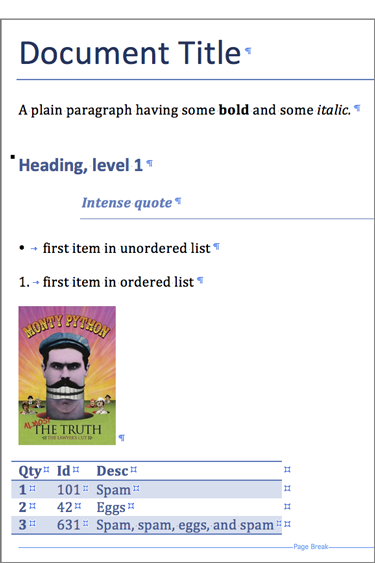
python 为脚本自动化操作 Word 提供了可能。最为常用是 python-docx .使用它可以方便地创建或更新 Microfoft Word(.docx) files.
下图是其官网给出的一个使用 python-docx 创建的 word 文档的 Demo:
文档地址:http://python-docx.readthedocs.io/en/latest/index.html
github: https://github.com/python-openxml/python-docx
这是官网给出的代码:
from docx import Document
from docx.shared import Inches
document = Document()
document.add_heading('Document Title', 0)
p = document.add_paragraph('A plain paragraph having some ')
p.add_run('bold').bold = True
p.add_run(' and some ')
p.add_run('italic.').italic = True
document.add_heading('Heading, level 1', level=1)
document.add_paragraph('Intense quote', style='IntenseQuote')
document.add_paragraph(
'first item in unordered list', style='ListBullet'
)
document.add_paragraph(
'first item in ordered list', style='ListNumber'
)
document.add_picture('monty-truth.png', width=Inches(1.25))
table = document.add_table(rows=1, cols=3)
hdr_cells = table.rows[0].cells
hdr_cells[0].text = 'Qty'
hdr_cells[1].text = 'Id'
hdr_cells[2].text = 'Desc'
for item in recordset:
row_cells = table.add_row().cells
row_cells[0].text = str(item.qty)
row_cells[1].text = str(item.id)
row_cells[2].text = item.desc
document.add_page_break()
document.save('demo.docx')
可以使用 pip 或 easy_install 来进行安装
pip install python-docx 或 easy_install python-docx
也可以直接下载安装文件来进行安装:
tar xvzf python-docx-{version}.tar.gz
cd python-docx-{version}
python setup.py install
要求Python 版本在2.6 以上或 3.3 以上,lxml 版本在 2.3.2及以上。 在 Windows 10 / Python 2.7 环境下安装时出现 lxml3.7.2 安装失败的问题,可降低版本进行尝试:
pip install lxml==3.4.2
from docx import Document document = Document()
新建一个空的 word 文档。当然,也可以打开一个已存在的 word 文档,只要传入相应的路径就好。
//version.h
#include <string>
#define API_MAJOR 1
#define API_MINOR 2
#define API_PATCH 0
class version
{
public:
static int GetMajor();
static int GetMinor();
static int GetPatch();
static std::string GetVersion();
static bool IsAtLeast(int major,int minor,int patch);
static bool HasFeature(const std::string& name);
}
这个类提供了单独返回当前版本号的主、次、补丁版本号的的访问函数。它们返回各 define 定义的值。GetVersion 方法向用户返回友好的字符串版本号信息。 当用户相比较版本号时,他们通常不关心版本号本身,而是想知道某些特性在该版本的API中是否存在。HasFeature() 方法 不是告诉用户哪个版本的 API 引入了哪些特性,而是让亿们直接测试某个特性是否可用。
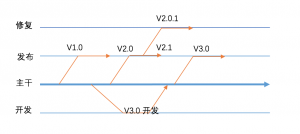
一般的大型项目通常会涉及到某种形式的分支策略,这需要同步开发、维护不同的软件版本发布。我们将讨论为项目选择分支策略和方针时需要考虑的一些事项。
每个软件都需要一条 trunk (主干)代码路线,它是
软件项目源码
的持久库。对于对于每次版本的发布
,可以从主干进行。每次新版本的开发,可以从主干的代码添加分支,而使主干的代码不受开发的影响而保持稳定。右图是一种常见的分支策略。
在API发布以后,对其所有的更改都应该表现为一个连续的过程,即不发布不兼容的非线性版本的API,一个版本的API应该是前一个版本功能的严格超集。在大型项目中,通常会有几条并行的代码分支在进行同时开发,这就会产生若干个并行维护的API版本。因此,工作在不同并行分支上的团队互不引入不兼容的特性是非常重要的。下列方法可以帮忙处理这种潜在的问题:
继续阅读
在c++11以前,我们获取当前时间的时间戳,需要借助于第三方库,如 boost ,或者针对不同的操作做不同的处理:
#ifndef _MSC_VER
#include <sys/time.h>
#endif
long long GetTimeSpan()
{
long long llTimeMs = 0L;
#ifdef _MSC_VER
timeb tb;
ftime(&tb);
lTimeMs = tb.time * 1000 + tb.millitm;
#else
timeval tmv;
gettimeofday(&tmv,NULL);
llTimeMs = (long long)(tmv.tv_sec) * 1000L + tmv.tv_usec / 1000;
#endif
return llTimeMs;
}
而在c++11中,这个问题得到解决。 c++11 标准库中提供 chrono库,用来处理时间相关的数据。
duration 表示一段时间间隔。其原型:
template <class _Rep, class _Period> class duration;
_Rep 为一个数值类型,如 int, long, 用来表示时钟数的类型。 _Period 为一个默认的模板参数 std::ratio,表示时钟周期。 ratio的原型:
template <intmax_t _Num, intmax_t _Den = 1> class ratio
它表示一个时钟周期的秒数。_Num 代表分子,_Den代表分母,它们的比值就是一个时钟周期,可以通过调整分子与分母来表示任意一个时钟周期。如 ratio<1> 表示一个时钟周期为1秒,ratio<3600>表示一个时钟周期为1小时,ratio<1,1000>表示一个时钟周期为1毫秒,ratio<1,2>表示一个时钟周期为0.2秒,ratio<9/7>表示一个时钟周期为9/7秒。 标准库将一些常用的时钟周期做了定义:
typedef ratio<1LL, 1000000000000000000LL> atto; typedef ratio<1LL, 1000000000000000LL> femto; typedef ratio<1LL, 1000000000000LL> pico; typedef ratio<1LL, 1000000000LL> nano; typedef ratio<1LL, 1000000LL> micro; typedef ratio<1LL, 1000LL> milli; typedef ratio<1LL, 100LL> centi; typedef ratio<1LL, 10LL> deci; typedef ratio< 10LL, 1LL> deca; typedef ratio< 100LL, 1LL> hecto; typedef ratio< 1000LL, 1LL> kilo; typedef ratio< 1000000LL, 1LL> mega; typedef ratio< 1000000000LL, 1LL> giga; typedef ratio< 1000000000000LL, 1LL> tera; typedef ratio< 1000000000000000LL, 1LL> peta; typedef ratio<1000000000000000000LL, 1LL> exa; typedef duration<long long, nano> nanoseconds; typedef duration<long long, micro> microseconds; typedef duration<long long, milli> milliseconds; typedef duration<long long > seconds; typedef duration< long, ratio< 60> > minutes; typedef duration< long, ratio<3600> > hours;
在不同的时钟周期中,我们可以使用 chrono_cast 来进行转换。两个 duration还可以进行加减运算:
#include <chrono>
#include <iostream>
using namespace std;
int main(int argc, const char * argv[]) {
chrono::hours hrs(2); //两小时
cout<<hrs.count()<<" hours = "; //count() 函数获取时钟周期下的时钟数
chrono::minutes mns = chrono::duration_cast<chrono::minutes>(hrs); //120分钟
cout<<mns.count()<<" minutes"<<endl;
chrono::minutes tm = hrs - chrono::minutes(30); //时长的加减运算
cout<<hrs.count()<<" hours - 30 minutes = " <<tm.count()<<" minutes = ";
typedef chrono::duration<double,ratio<3600,1>> hs; //时长的类型转换。注意 duration 的 _Rep 参数类型。
hs c = chrono::duration_cast<hs>(tm);
cout<<c.count()<<" hours"<<endl;
return 0;
}
//# 输出 #:
// 2 hours = 120 minutes
// 2 hours - 30 minutes = 90 minutes = 1.5 hours
在C++ 中,遍历一个容器的方法一般是这样的:
#include <iostream>
#include <vector>
int main(void)
{
std::vector<int> vec;
//do sth
std::vector<int>::iterator it = vec.begin();
for(; it != vec.end(); ++it)
{
std::cout<< *it <<std::endl;
}
return 0;
}
对STL比较熟悉的程序员肯定还知道在 <algorithm> 中有一个 for_each 算法,可以用来完成上述功能:
int main(void)
{
std::vector<int> vec;
//do sth
std::for_each(vec.begin(), vec.end(), [](auto val){std::cout<<val<<std::endl;});
return 0;
}
这里借助了 auto 关键字和 lambda 表达式简化了操作。 std::for_each 比起前面 for 循环,最大的好处是不再需要关注迭代器的概念,而只需要关心容器中的元素类型即可。 但这两种方法,都必须显式的给出容器有开头和结尾(begin,end).这是因为上面的两种方法都不是基于范围(range)来设计的. 范围的概念在很多高级语言中都有涉及。例如下面这段 python 代码:
arr = [1,2,3,4,5]
for n in arr:
print n
在这种循环中,不再需要关心容器的两端,循环会自动以容器的范围进行展开。而且这种语法可以清楚地表明它的意义。使用这种方式进行循环无疑会使编码和维护更加简便。 现在,c++11 可有了基于范围的 for 循环:
使用 class 关键字来创建一个类。
class ClassName:
'类的注释'
class_suite #类体
类的注释可由 ClassName.__doc__ 来查看。class_suite 由类的成员、方法、属性组成
实例
#-*- coding:utf-8 -*-
class Student:
'学生'
def __init__(self, name,sex,num):
self.name = name
self.sex = sex
self.num = num
def displayInfo(self):
print "Name:",self.name,",Sex:",self.sex,",Num:",self.num
def __del__(sefl):
class_name = self.__class__.__name__
print class_name,'Deleted'
要创建一个类的实例,可以调用该一特殊的函数来完成。该函数的名称为类的名称,参数为该类的 __init__()的参数。
>>> from Student import Student
>>> s = Student('A',1,1)
>>> s.displayInfo()
Name: A ,Sex: 1 ,Num: 1
>>> print s.name #属性
A
>>> print s.__doc__
学生
>>> print Student.__doc__
学生
还可以使用下列函数来访问属性: